
It isn’t often that I remember to document the actual process of making one of my wool sculptures. I get so caught up in it that I just keep stabbing and suddenly I realize I have no pictures of the thing getting its head put on or it’s 3/4ths done and I haven’t taken any pictures yet! Thankfully, while creating Vincent, my Starry Sky Whale, I remember to take photos regularly. I’m rather excited to share the process with you because I tried a few new techniques!
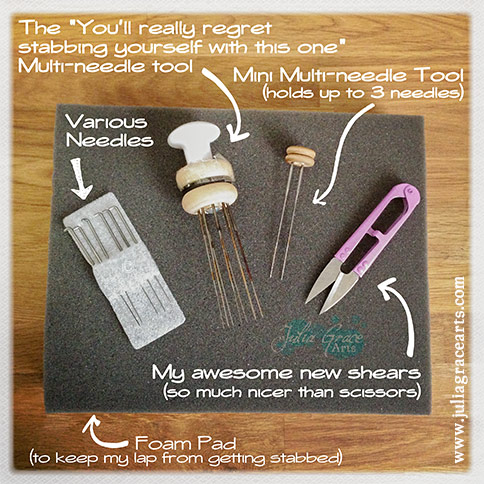
I’ll put up a dedicated blog post to how felting works at some point, but to summarize for those who don’t know, to needle felt you stab a ball (or any other shape) of wool many hundreds (perhaps even thousands) of times with a special needle to compress the wool into shape. The needles themselves have little barbs in them, like inverted fish hooks, that allow them to catch the fibers and tangle them together when you stab the wool. Here are some of my tools:
![]()
To create my Sky Whale, just like with any other sculpture, I started off with a basic shape around the general size of what I wanted the finished piece to be. I chose to make his core a different color as well because I have quite a bit of it and rather less of the colors I wanted him to appear. This first picture is right after I felted the giant ball of fluff into shape. Next time I will try to get a photo of the amount of fleece I use before starting. You have use a bigger puff of fleece than what you want as the final size since it compresses so much. The ball of fleece I started with this time was rather unwieldy!
![]()

After I have the basic shape, I then start to build up and define it. When I use a separate core color I only build it up to a certain point because I’ll be covering it with another color and don’t want it to end up too large or for the core color to show through. I left the tip of the tail poofy so I would be able to create a strong joint when adding the tail.
![]()

Time for the first experiment! I imagined my Sky Whale with a mottled skin of blues, purples, and greens, with bits of bright sparks of starlight. The only way to achieve that was to card many different colors of fleece together. I’ve blended wool before, but trying to get something mottled appearing was new. I’ve discovered it’s actually very easy if you are using more than one texture of wool! The base blue and red colors were wool roving, which is smooth and has all the fibers going in one direction. Blending two rovings together generally creates a very smooth, even blend. The mottling colors of green, purple, and cyan were batting, which wasn’t smooth at all. Bits of the wool clumped together and the fibers went in all directions. It was perfect for creating the blobs of color spread throughout the base color. It was really fun learning to use the different textures to their best advantage.
In this picture you can see the pile of all the fleece colors waiting to be blended by combing them on one side of the brushes and the resulting blend on the other. It was really quite satisfying to mix them.
![]()

While I was carding the fleece, Jude was busy sneaking into my box of wool.
![]()

Lilith found it highly amusing to bat at Jude through the plastic, which annoyed him, especially since the racket alerted me to the intruder in the wool.
![]()

Once I chased the cats out of my wool and finished blending the color I wanted to use for his skin I started applying it to the core.
![]()

After that I created a second blend for the belly color and refined the shape even more. I also defined the tail a little.
![]()

Now came the hard part and the real experimenting began! I wanted to create feathery fins, but I wasn’t quite sure how to achieve it. I could felt every feather, but that would have been very time-consuming and I didn’t think it was possible to securely felt them to a thin fin without it getting over felted and cutting off. I thought perhaps I could wet felt a swatch of material and cut them out, so I got some of my blue fleece and made my first wet felted swatch!
To wet felt wool, you crisscross layers of fiber and then get it wet with hot water, add a little soap, and then agitate it. This causes the fibers to felt together. I was surprised at how easy it was and how quickly the felt came together as compared to needle felting. Here I have my square of layered fibers in a pan between some bubble wrap and tulle. I then got it wet and soapy and rubbed it against the bubble wrap and tulle, like you would rub a balloon on someone’s head to cause their hair to stand up.
![]()

Here is the resulting swatch of felt.
![]()

I then cut it into strips and started covering the strips with the skin color. Unfortunately it didn’t work out the way I was expecting and it was labor intensive to cover the strips.
![]()

At this point Lilith made it clear I’d paid enough attention to the “wet stuff” and she would not be ignored any longer.
![]()

After I’d appeased the hellion I decided I’d try felting the whole fin and cutting the feathers into it. Since I’d been able to cut the swatch of wet felted fabric into strips without it fraying the way a needle felted swatch would, I was optimistic that if I wet felted the whole wing it would stay together after I cut the feathers. First I loosely felted the basic wing shape out of the blue fleece and covered it with some of the skin color. Then I got the whole thing wet and soapy and proceeded to wet felt it.
![]()

It worked splendidly! After drying the felt with a hair dryer, I cut strips into the wing, then refined the edges by needle felting it. I also added some more skin color as the wet felting had caused it to blend more and lose some of the mottling. Here you can see one feathered fin and one fin before I cut the strips into it. The ends are loose so that I can firmly attach them to the body of the whale.
![]()

The tail of the sky whale was a little more tricky because I had to felt it directly on the body instead of adding it like the wings. Here’s the basic shape needle felted in the blue roving, which gives it the stability when wet felted.
![]()

And here’s the top part of the tail after it’s been covered in the skin color and wet felted, you can see how much more dense and sharp edged it’s become.
![]()

This is the bottom, which is the same teal color as the belly. I did the same for the wings.
![]()

Here is the tail after I cut in the feathers and refined the edges. Getting them both wings and sides of the tail as symmetrical as possible involved quite a bit of trimming!
![]()

Now I had the wings and tail finished, so there was just the dorsal fin left. I ended up using the few “feathers” I’d made with the strips of wet felted fabric, so they didn’t go to waste! Here is the whale after I attached all his appendages. He’s almost done! It was really nice to see him come together all at once.
![]()

I defined his mouth and added the seed bead eyes, but when I looked at him, there was just something…missing. He didn’t have enough spark. That one thing to make him really stand out was missing. By this time It was around 5:45am since I was working under a deadline of 12noon. I actually called him done and started taking his “portraits”, but the missing something kept bugging me. After trying and discarding a few ideas I realized he didn’t have enough contrasting stars! I grabbed some yellow wool and started adding little sparks of light all over. Here you can see his size in relation to my hand and the first couple yellow stars I’d added.
![]()

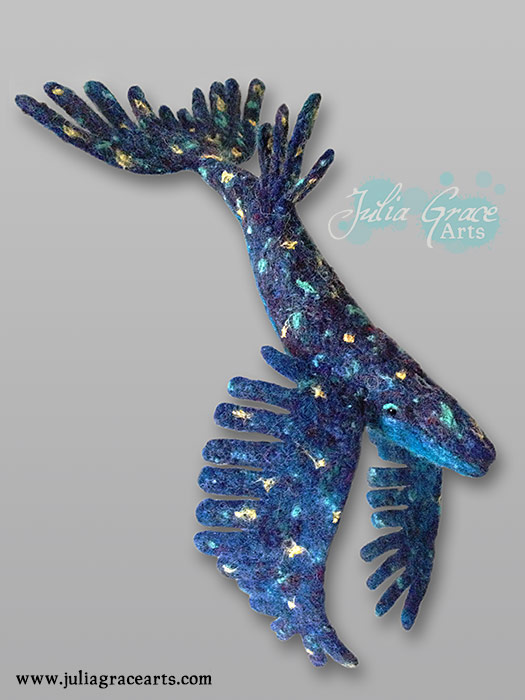
After adding a bunch of yellow sparks, he was finally complete! What a handsome fellow if I do say so myself. He was so much fun to create and I enjoyed learning all the new techniques. He also taught me to never ignore that niggling feeling that something is missing!
![]()
You can see details shots of him as well as a photo-manipulation of him in space here!
I hope you enjoyed reading about my process. If you have any questions about it or any of the techniques, leave a comment! I love chatting about felting.
**Update**
Vincent was chosen as one of 20 finalists for February Tale art for the Calendar of Tales Project! Wow! I’m so excited!! He is featured on the official website here (scroll down or click to February and he’s a thumbnail below the winner)
May you travel long and well among the stars!
– Jülz


